Capturing the essence of your travels through photography is an art form that combines technical skill, creative vision, and a deep appreciation for the world around you. Whether you’re exploring ancient ruins, bustling cityscapes, or serene natural landscapes, mastering the art of travel photography can transform your memories into stunning visual stories. This comprehensive guide will equip you with the knowledge and techniques needed to elevate your travel photography to a professional level, ensuring that your images not only document your journeys but also inspire and captivate viewers.
Essential camera equipment for travel photography
The foundation of exceptional travel photography lies in having the right tools at your disposal. While it’s true that the photographer’s eye and skill are paramount, quality equipment can significantly enhance your ability to capture those perfect moments. A versatile camera body is the cornerstone of your kit. For travel, a mirrorless system offers an ideal balance of image quality and portability. Look for models with weather-sealing to withstand diverse environments you might encounter.
Lens selection is crucial for travel photography. A good starting point is a versatile zoom lens, typically in the 24-70mm range, which covers wide-angle to short telephoto focal lengths. This allows you to capture expansive landscapes and intimate portraits without constantly switching lenses. For more specialized shots, consider adding a wide-angle lens (16-35mm) for dramatic landscapes and architecture, and a telephoto lens (70-200mm) for wildlife and distant subjects.
Accessories can make or break your travel photography experience. A sturdy, lightweight tripod is essential for low-light situations and long exposures. Invest in extra batteries and memory cards to ensure you never miss a shot. A polarizing filter can enhance skies and reduce reflections, while a neutral density filter allows for creative long exposures even in bright conditions. Don’t forget a comfortable camera bag that provides quick access and adequate protection for your gear.
Mastering composition techniques for stunning landscapes
Composition is the visual language of photography, and mastering it is key to creating compelling images that resonate with viewers. While rules can be broken for creative effect, understanding fundamental composition techniques provides a solid foundation for capturing stunning landscapes.
Rule of thirds in iconic locations like Santorini and Machu Picchu
The rule of thirds is a classic composition technique that divides the frame into a 3×3 grid. Placing key elements along these lines or at their intersections creates a balanced and visually appealing image. When photographing iconic locations like the white-washed buildings of Santorini or the ancient ruins of Machu Picchu, use this technique to add dynamism to your shots. For example, position the horizon along the upper or lower third line rather than bisecting the frame, and place significant architectural elements at the intersections of the grid lines.
Leading lines: utilizing roads, rivers, and architecture
Leading lines are powerful compositional tools that guide the viewer’s eye through the image. In travel photography, natural and man-made elements can serve as compelling leading lines. A winding road through a Tuscan countryside, a meandering river in the Amazon, or the symmetrical lines of Islamic architecture in Morocco can all draw the viewer into the scene. When composing your shot, identify these lines and use them to lead towards your main subject or to create a sense of depth and perspective.
Framing techniques with natural elements at national parks
Framing your subject with natural elements adds depth and context to your images. In national parks, look for opportunities to use tree branches, rock formations, or archways to frame iconic vistas. This technique not only draws attention to your main subject but also provides a sense of place and scale. For instance, framing Half Dome in Yosemite through a natural rock arch creates a more engaging and unique perspective than a straightforward landscape shot.
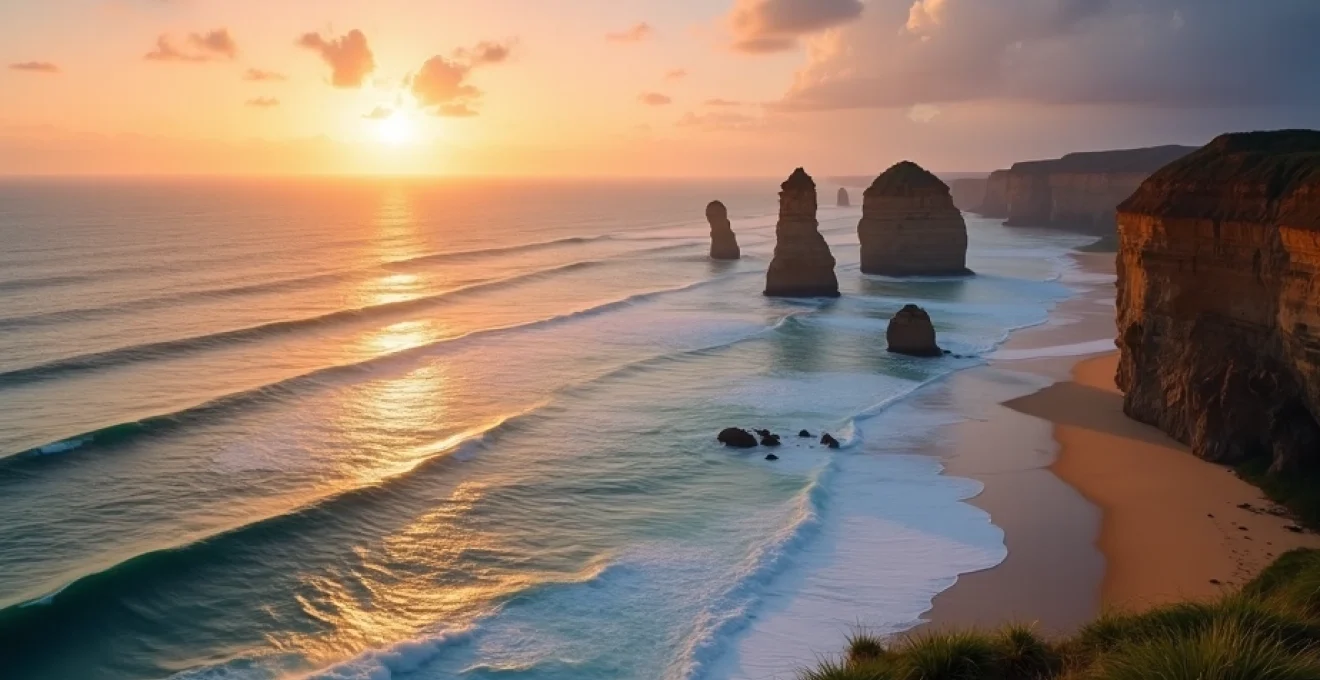
Balancing foreground and background in coastal scenes
Coastal landscapes offer a wealth of photographic opportunities, but balancing foreground and background elements is crucial for creating depth and interest. Incorporate foreground elements such as rocks, sand patterns, or beach vegetation to lead the eye into the scene. These elements provide a sense of scale and can anchor the composition. When photographing seascapes, experiment with different shutter speeds to capture the motion of water, creating a dynamic foreground that complements the static background elements like cliffs or distant islands.
Optimal camera settings for various travel scenarios
Understanding how to adjust your camera settings for different travel scenarios is crucial for capturing high-quality images in diverse conditions. Each situation presents unique challenges and opportunities, requiring a tailored approach to camera settings.
Low-light photography in european cathedrals and night markets
Low-light environments like the intricate interiors of European cathedrals or the vibrant atmosphere of Asian night markets demand specific camera settings to capture detail and ambiance without excessive noise. Increase your ISO to allow for faster shutter speeds, but be mindful of your camera’s noise performance at higher ISOs. A good starting point is ISO 1600-3200, depending on your camera’s capabilities. Use a wide aperture (low f-number) to maximize light gathering, typically f/2.8 or wider if your lens allows. Stabilize your camera with a tripod or by bracing against a stable surface to allow for slower shutter speeds without introducing camera shake.
Fast-action settings for wildlife safari shots
Wildlife photography on safari requires quick reactions and appropriate settings to freeze motion and capture sharp images of animals in action. Use a fast shutter speed, typically 1/1000th of a second or faster, to freeze movement. Increase your ISO as needed to achieve this shutter speed, even in good light. Choose a continuous autofocus mode (AF-C or AI Servo) to track moving subjects, and select a burst shooting mode to capture a series of images, increasing your chances of getting the perfect shot. A telephoto lens with image stabilization will help you get close-up shots while minimizing camera shake.
Depth of field control for street photography in busy cities
Street photography in bustling urban environments requires careful control of depth of field to isolate subjects from busy backgrounds. Use a wide aperture (f/2.8 or wider) to create a shallow depth of field, blurring the background and drawing attention to your subject. This technique is particularly effective for portraits and detail shots. In scenes where you want more of the environment in focus, stop down to f/5.6 or f/8 for a greater depth of field. Be prepared to adjust your settings quickly as lighting conditions can change rapidly in urban environments.
Long exposure techniques for waterfalls and cityscapes
Long exposure photography can transform moving water into silky streams and turn cityscapes into dazzling light shows. For waterfall shots, use a tripod and set your camera to a low ISO (100 or 200) and a small aperture (f/11 or f/16) to allow for longer exposure times. Shutter speeds between 1/2 second and several seconds will create the smooth water effect. For night cityscapes, extend your exposure time to several seconds or even minutes to capture light trails from traffic and emphasize the glow of city lights. Use a remote shutter release or your camera’s self-timer to avoid camera shake when triggering the shutter.
Post-processing workflows for travel images
Post-processing is an integral part of modern digital photography, allowing you to refine and enhance your travel images to fully realize your creative vision. Developing an efficient and effective post-processing workflow is key to maintaining consistency across your portfolio and bringing out the best in each image.
Adobe lightroom presets for different travel themes
Adobe Lightroom is a powerful tool for organizing and editing your travel photos. Creating or using presets can streamline your workflow and help establish a consistent look across your images. Develop presets for different travel themes, such as « Tropical Beaches, » « Urban Exploration, » or « Mountain Landscapes. » These presets can adjust basic settings like exposure, contrast, and color balance, as well as more advanced parameters like tone curves and split toning. Remember that presets should be a starting point; fine-tune each image individually to account for unique lighting conditions and creative intentions.
Color grading techniques to enhance cultural vibrancy
Color grading is a powerful way to enhance the mood and atmosphere of your travel images, particularly when it comes to conveying the cultural vibrancy of different destinations. Use the HSL (Hue, Saturation, Luminance) panel in Lightroom or similar tools in other editing software to selectively adjust specific color ranges. For example, boost the reds and yellows to enhance the warmth of a Moroccan market scene, or emphasize blues and greens to capture the lush atmosphere of a tropical rainforest. Be cautious not to oversaturate; subtle adjustments often yield the most natural and pleasing results.
Noise reduction and sharpening for Low-Light travel photos
Low-light travel photos, such as night scenes or indoor shots, often require noise reduction and careful sharpening to achieve optimal image quality. Start with noise reduction, using a tool like Lightroom’s Detail panel or dedicated software like DxO DeepPRIME. Apply noise reduction conservatively to maintain texture and detail. Follow this with sharpening, using a mask to target edges and important details while avoiding noise amplification in smooth areas. The key is to find a balance between noise reduction and sharpening that preserves the integrity of the image while enhancing its clarity.
HDR merging for High-Contrast scenes like sunsets and markets
High Dynamic Range (HDR) techniques can be invaluable for capturing the full tonal range of high-contrast scenes common in travel photography, such as dramatic sunsets or bustling markets with bright highlights and deep shadows. Capture a series of bracketed exposures, typically three to five images at different exposure levels. Use software like Lightroom’s HDR Merge or dedicated HDR programs to combine these exposures. Aim for a natural-looking result that preserves the scene’s contrast while revealing detail in both highlights and shadows. Subtle HDR processing can produce stunning results that closely resemble what the human eye perceives.
Ethical considerations in travel photography
As travel photographers, we have a responsibility to approach our craft with respect for the people, cultures, and environments we encounter. Ethical considerations should be at the forefront of our minds, guiding our decisions and interactions as we capture the world through our lenses.
Respecting local customs and privacy in portrait photography
Portrait photography in foreign cultures requires sensitivity and respect. Always ask for permission before photographing individuals, especially in more conservative societies. Learn a few key phrases in the local language to facilitate these interactions. Be aware of cultural taboos; some cultures may have restrictions on photography of certain people, places, or activities. When photographing children, always obtain consent from a parent or guardian. Respect people’s privacy and dignity; avoid exploitative or sensationalist images that could perpetuate stereotypes or misrepresent the culture.
Environmental impact of drone photography in sensitive areas
Drone photography has opened up new perspectives in travel imagery, but it comes with significant ethical and legal considerations. Research local laws and regulations regarding drone use before your trip. Many countries have strict rules or outright bans on drone photography. In environmentally sensitive areas, consider the impact of your drone on wildlife and ecosystems. Avoid disturbing animals or disrupting natural habitats. In populated areas, be mindful of privacy concerns and avoid flying over private property without permission. Always prioritize safety, keeping your drone within visual line of sight and avoiding restricted airspace.
Authentic representation of cultures and landmarks
As travel photographers, we have a responsibility to represent cultures and landmarks authentically. Avoid staging scenes or asking people to act in ways that are not true to their culture. When photographing iconic landmarks, strive to capture them in a way that respects their cultural or historical significance. Be cautious about perpetuating harmful stereotypes or oversimplifying complex cultural issues. Provide context for your images through accurate captions and descriptions. Consider how your photographs might be perceived by members of the culture you’re representing, and strive for a balanced and respectful portrayal.
Advanced techniques for unique travel perspectives
To truly stand out in the world of travel photography, it’s essential to explore advanced techniques that offer unique perspectives on familiar subjects. These methods can transform ordinary scenes into extraordinary images, capturing the imagination of viewers and providing fresh insights into well-traveled destinations.
Astrophotography in dark sky reserves like Namibia and New Zealand
Astrophotography in dark sky reserves offers a spectacular way to capture the night sky in all its glory. Locations like the NamibRand Nature Reserve in Namibia or the Aoraki Mackenzie International Dark Sky Reserve in New Zealand provide ideal conditions for photographing the Milky Way and star trails. Use a wide-angle lens with a large aperture (f/2.8 or wider) to gather as much light as possible. Set your camera to a high ISO (typically 3200-6400) and use long exposures (15-30 seconds) to capture star detail without creating star trails. For star trail images, use even longer exposures or stack multiple exposures in post-processing. A sturdy tripod and remote shutter release are essential to avoid camera shake during these long exposures.
Underwater photography in the Great Barrier reef and Maldives
Underwater photography in locations like the Great Barrier Reef or the Maldives allows you to explore a whole new world of visual possibilities. Invest in a quality underwater housing for your camera or consider a dedicated underwater camera for shallower depths. Use a wide-angle lens to capture the expansive underwater landscapes and to get close to subjects, minimizing the amount of water between the camera and your subject. Strobe lights or video lights can help restore color lost at depth and illuminate subjects. Pay attention to your buoyancy control to avoid damaging delicate marine environments. Practice in shallow water before attempting more challenging dives, and always prioritize your safety and that of the marine life around you.
Time-lapse sequences of bustling city centers and natural phenomena
Time-lapse photography can compress hours of activity into seconds, revealing patterns and movements not visible to the naked eye. In bustling city centers, set up your camera to capture the ebb and flow of traffic and pedestrians over several hours. For natural phenomena like the Northern Lights or cloud formations over mountains, longer time-lapse sequences can reveal dramatic changes over time. Use an intervalometer (built-in or external) to automate the capture process, typically taking a photo every few seconds or minutes depending on the subject. A stable tripod is crucial, as is a power bank for extended shoots. In post-processing, combine the individual frames into a video sequence using software like Adobe After Effects or dedicated time-lapse programs.
Panoramic stitching for vast landscapes and cityscapes
Panoramic stitching allows you to capture sweeping vistas that extend beyond the limits of a single frame. This technique is particularly effective for vast landscapes like the Grand Canyon or expansive cityscapes like the Hong Kong skyline. To create a panorama, take a series of overlapping shots, rotating the camera between each frame. Maintain consistent exposure settings across all shots to ensure smooth blending. Use manual focus and a narrow aperture (f/8 or f/11) to ensure consistent depth of field across the panorama. A tripod with a panoramic head can help maintain a level horizon and consistent overlap between frames. Stitch the images together in post-processing using software like Adobe Lightroom or specialized panorama tools. This technique allows you to create high-resolution images that capture the grandeur of expansive scenes in incredible detail.